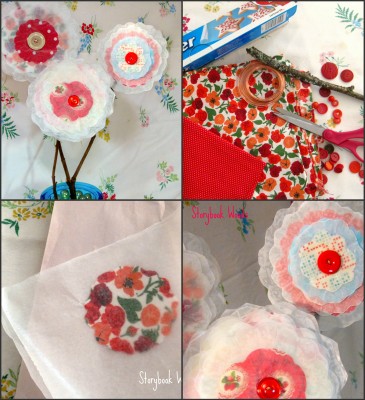
I love working with wax paper. I think it is the opaque quality it has. Plus it is dirt cheap. I wanted a bouquet for my outdoor gazebo. Something that could withstand the wind and rain in the summers of western Washington. I played around and came up with these wax paper flowers. You could do a zillion things with them. Add them to scrapbooking pages, make a fun pin for your lapel or add them to a pretty package. I wired mine to sticks to make a bouquet. They are very easy to make but there is one caveat, so follow my instructions below about ironing the wax paper together. Otherwise, have fun!

You will need wax paper, pretty fabric, scissors, a piece of cardboard, iron, button and wire.
1. Cut out a flower from the fabric. The best way to do this is to trace a circle onto the fabric. After you cut the circle, fold in half and then half again. Then trim the raw edge to make a rounded edge. When you open up the circle, you will have a scalloped edge.
2. Tear two squares of wax paper, at lest twice as big as your flower. Now this is the important part! You want a good inch of wax paper around the edge of your flower. Heat iron on high. Do not try to iron until it is fully hot. Set a piece of cardboard under your flower to absorb the melting wax. Now quickly run the iron around the wax paper on the edge of the flower. You do not need to iron the fabric center, just the wax paper edge. But it takes only a second or two. If you iron too long, the wax melts away and the paper will not stick. Try playing with a few pieces and you will see what I mean. All you need to do is melt the wax enough to get the papers to stick.
3. When wax has cooled, (a minute or two after you ironed), cut the wax paper following the shape of the flower. It does not have to be perfect. Actually I think they look better not too perfect. Remember to not cut too close to the fabric. Leave about an inch of melted wax paper around the fabric!
4. To add a button to the center, run a thick piece of wire through the button holes, then through each flower and twist wire in back to secure button. If you want to do a bouquet, then twist the wire again around a stick.
Clarice Fox- Hughes, is the writer of Storybook Woods where she blogs about cooking, crafting and making the most of what she has. She also has written a novel Wren Bay, based upon her blog, with 41 of her recipes.

