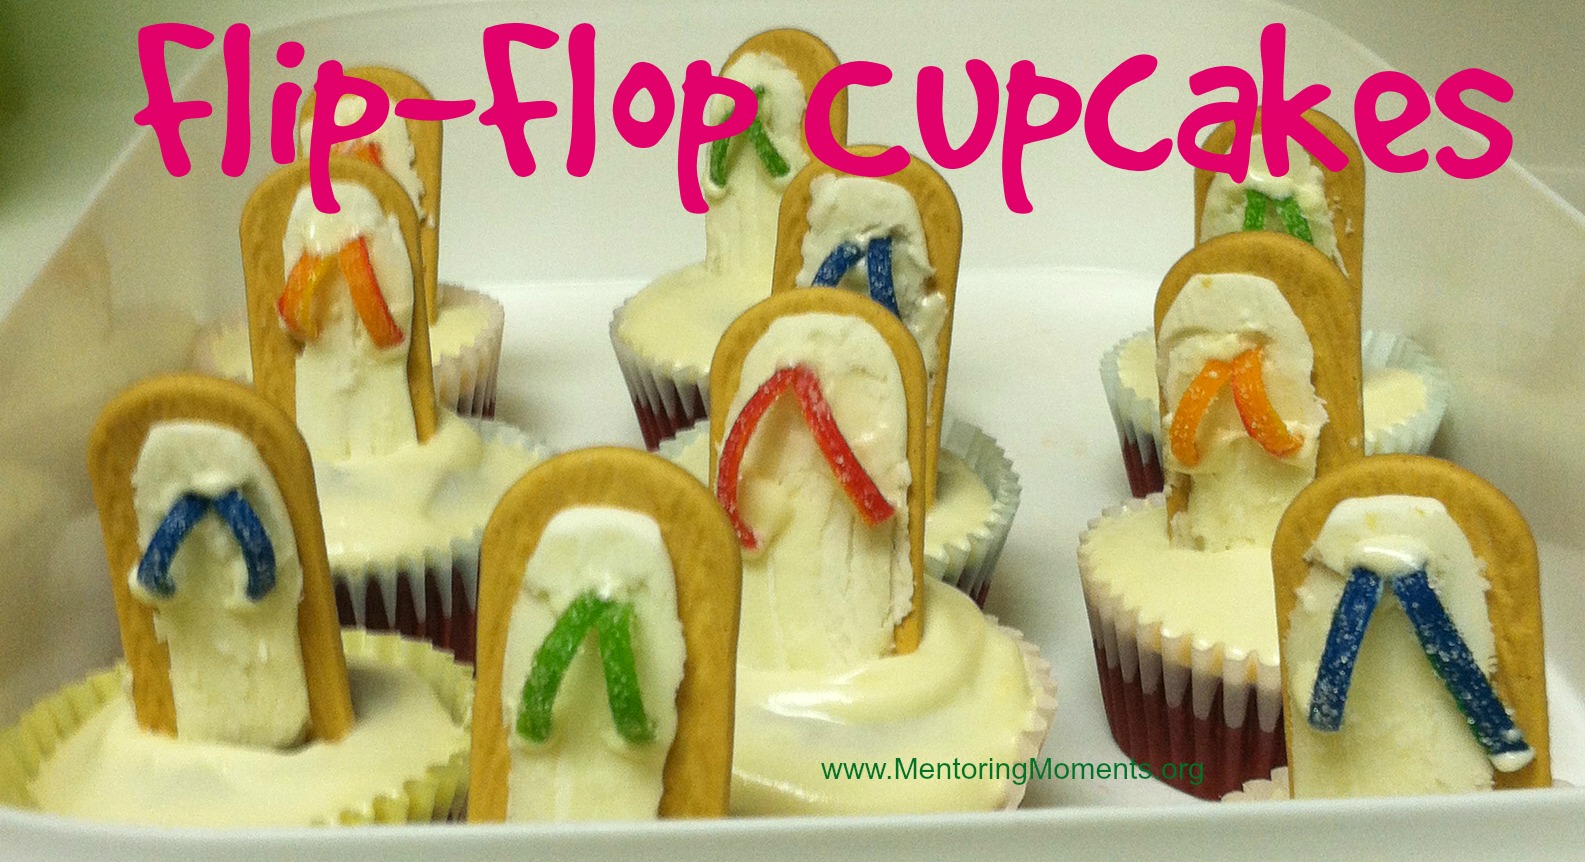
Christmas Petit Fours
December 15, 2011 : Filed under 12 Days of Christmas 2011, Cakes, Recipe Box, Special Occasions, Sweets

When I tasted these delicious petit fours at my sister’s baby shower, I knew I had to make them for my family’s Christmas celebration. Although mine did not look as perfect as the ones I had eaten at the shower, they were every bit as yummy. These decadent treats are well worth the extra time and effort they take to make. I owe a debt of gratitude to Kaaren Rue for giving me this fantastic recipe which will now be an annual Christmas tradition for our family!
1) Bake this cream cheese pound cake in a jelly roll pan, so that the cake is about 1” thick. Instructions for making the petit fours are below the cake recipe.
Cream cheese poundcake:
2 sticks margarine (softened to room temperature)
1 stick butter (softened to room temperature)
One 8 oz package cream cheese (softened to room temperature)
3 cups sugar
6 eggs (room temperature)
3 cups sifted cake flour (if cake flour is unavailable, sift all purpose flour twice)
2 tsps vanilla
1) Cream the margarine, butter and cream cheese with an electric mixer until very fluffy (about 5 minutes). Add sugar and beat for 5 additional minutes. Add eggs two at a time, beating well after each addition. Add sifted flour and vanilla and mix well.
Bake in a 325F oven for 1+ hour in a greased and floured pan. Start testing for doneness after 1 hour.
2) Remove cake from pan and allow to cool. Cool the pound cake thoroughly, wrap well in saran wrap, then a layer of aluminum foil. Freeze the cooled cake solid until you are ready to cut it into squares and glaze it. This can be done weeks in advance if desired. The frozen cake is much easier to cut and has less crumbs, so this is an important step even if you are not making it far in advance.
3) Remove frozen sheet cake from freezer. With a very sharp serrated knife, trim all edges off frozen cake. Score cake in 1 x 1” squares. You can use a ruler so the lines are straight. Cut the cake into squares and set on cooling racks with cookie sheets placed underneath. If your cake is more than approximately 1” thick, you may need to trim off the bottom of the squares so that the glaze will cover them evenly.

4) Make Petit Four Glaze:
Petit Four Glaze
9 cups sifted powdered sugar (this will take 2 pounds)
½ cup light corn syrup
½ cup water
2 tsps almond extract
4 oz. melted vanilla almond bark
Melt all ingredients together in a double boiler or large melt-proof bowl set over a pot of simmering water. Melt and stir until the mixture becomes very smooth. You can add a tiny bit of water, a little at a time, if the mixture is too thick. Be careful not to overheat. The glaze should pour easily from a metal ladle.
5) When the glaze is the consistency you like, begin pouring it gently and slowly over each square of cake. The cookie sheet underneath the cooling rack will catch all the drips.
6) It will take multiple layers of glaze to get good coverage. You may need to double or triple the above glaze recipe if you don’t want to see any cake through the glaze. Be sure to reserve a small amount of glaze for decorating your petit fours.
7) Let the glaze dry. Tint some of the glaze and put it into a Ziploc bag. Cut a very tiny hole in the tip of the bag and decorate the cakes with lines, swirls, hearts, etc.
8) My friend discovered that you can scrape the icing from the cookie sheet and reheat it one time. After more than one reheating, however, the icing starts to get gloppy. Also, if you are reheating the icing, make sure there are no cake crumbs in it.
9) I kept half the sheet cake frozen for later use, and refrigerated half the glaze for about 3 weeks. This enabled me to serve the petit fours at two different occasions, since this recipe makes a large quantity of this decadent dessert. I did not notice any major differences in the look or taste of the cakes or glaze the second time around.


Dream Cake
September 16, 2011 : Filed under Art of Homemaking, Cakes, In the Kitchen, Sweets
This recipe was one of my mom’s favorites. I don’t recall it ever having a proper name so I have decided to call it Summer Dream Cake. It’s easy, peasy and still perfect right now with early fall weather.

1 large Angel food Cake
2 envelopes of Kraft Dream Whip topping
4 Crispy Crunch chocolate bars (Heath or Twix bars work too)
~ Split the angel food cake in half, creating two layers…

~ Crush the chocolate bars (fun). I use a heavy Ziploc bag and my rolling pin. I also put the bag in the freezer afterwards, then none of the chocolate sticks to the bag, and you don’t lose any of the crunchy goodness!

~ Prepare the whip topping according to directions…

~ Fold the crushed chocolate bars into the whipped topping…

~ Frost like a regular layer cake…and yes, I filled in the hole!

~ Refrigerate for a couple of hours before serving. I do have to note you can probably make this with two chocolate bars and one envelope of dream whip. I do not think they are making the cakes as big as they used to, but nobody complained about too much frosting.
Katharine is mom to four incredible kids and wife to the best husband on the planet. Visit her blog…
Black Forest Cake
November 10, 2010 : Filed under Art of Homemaking, Cakes, In the Kitchen, Recipe Box
This fancy, delicious cake isn’t too complicated, in spite of requiring several steps. My oldest son won a blue ribbon with it at the county fair when he was in 5th grade, and we often serve it for birthdays in our home. Having lived in Europe for several years, I can honestly say this cake is fairly authentic, and well worth that extra little bit of time and trouble.
Ingredients:
Cake:
German chocolate cake mix (prepared according to box directions)
Syrup:
¼ c. sugar
1/3 c. water
1 tsp. cherry or almond extract
Butter cream filling:
1 ½ cups powdered sugar
1/3 c. butter
1 tsp. cherry or almond extract
1 or 2 Tbsp. reserved cherry juice (see below) or milk
A few drops red food coloring (optional)
Topping:
2 cups heavy whipping cream
2 Tbsp. powdered sugar
2 cans sour cherries, drained and patted dry (reserve a few Tbsp. of the juice)
8 oz. semisweet chocolate bar, shaved (optional)
Instructions:
1. Prepare cake mix according to instructions. Pour into 3 round cake pans. If you don’t have 3 round pans you’ll have to make this in separate batches, or have a shorter cake with less layers.
2. While the cake is baking, prepare the syrup. Mix the sugar and water in a small pan and bring it to a boil until the sugar is dissolved. Remove from heat and add the extract.
3. When the cake rounds have cooled, prick them with a fork and brush the syrup on the underside of each layer.
4. Prepare the butter cream frosting by beating the butter and powdered sugar together until well incorporated. Add the extract and a couple drops of red food coloring if you want the frosting to be pink (white is more traditional). Thin the frosting with a tablespoon of either milk (for white butter cream) or the reserved juice from the drained cherries (for pink butter cream). Add additional liquid or powdered sugar as necessary to make a thick butter cream frosting.
5. Assemble the cake: place one layer (syrup side facing up) on a cake platter. Frost with ½ of the butter cream icing. Add 1/3 of the sour cherries (make sure you have drained them well and they are patted dry). Add the second cake layer, topping it with the remaining frosting and 1/3 of the cherries, as before. Place the third cake layer on top, syrup side down.
6. Beat the whipping cream until it is fluffy, adding the powdered sugar as you go. Once the whipped cream is ready, use it to frost the entire cake.
*Note: if you are making this cake ahead of time, stop after step 5 and refrigerate the unfinished cake. The whipping cream will begin to weep over time, and this step should be saved until shortly before you are ready to serve the cake.
7. Decorate the frosted cake with the remaining sour cherries. Sprinkle with chocolate shavings, if desired.
Helpful tips:
- Make sure cherries are well placed around the edges of each layer as well as in the middle so the cake doesn’t “sag” on one side.
- Be sure to use sour cherries, not sweet ones. They make ALL the difference!
- Save the prettiest cherries for the top of the cake and use crushed ones in the center of the lower layers.
- This cake can be refrigerated overnight, but it will not last more than a couple of days due to the real whipped cream frosting.
Mix Tricks: Coconut Bundt Cake
June 8, 2010 : Filed under Art of Homemaking, Cakes, In the Kitchen, Recipe Box
This is one of my favorite recipes for a potluck dessert. It can be adapted from Triple Chocolate to Lemon Blueberry to White Chocolate Strawberry just by changing the cake mix, pudding mix and add-on flavors. The cake in the photo is the coconut version.
Here’s the basic recipe:
Ingredients:
1 boxed cake mix
4 eggs
1 cup sour cream
1/2 cup oil
1/2 cup water
1 package instant pudding
1 cup chosen add-on ingredient (white or chocolate chips, blueberries, coconut, etc.)
Preheat oven to 350F. Mix first 6 ingredients together. Stir in the add-on ingredient. Bake one hour in a greased Bundt pan or other large cake pan.
I like to slightly warm a carton of prepared frosting for a few seconds in the microwave and drizzle it over the cooled cake.
Possible variations:
chocolate cake mix, chocolate pudding, chocolate chips, chocolate frosting
lemon cake mix, lemon pudding, blueberries, lemon frosting
strawberry cake mix, strawberry or vanilla pudding mix, white chocolate chips, vanilla frosting
yellow cake mix, vanilla pudding, chocolate chips, chocolate frosting
spice cake mix, vanilla pudding, raisins, cream cheese frosting
white cake mix, coconut cream pudding, coconut flakes, cream cheese frosting (sprinkle top with coconut)
To leave a comment:
- If you are reading this post in email form, click the article headline. This will take you to the article on MMCW’s website.
- Scroll down until you see the box entitled ‘Speak Your Mind’.
- Enter your name, email (it will not be published) and your website or blogsite if you have one (you do not have to have one).
- Click on the big empty space and then begin typing your comments.
- When you are done, click ‘submit comment’. That’s it! We look forward to hearing from YOU!
Caramel Mocha Truffle Cupcakes–Can You Say Yum!
March 3, 2010 : Filed under Art of Homemaking, Cakes, In the Kitchen, Recipe Box, Sweets
For these cupcakes, I altered the recipe for Caramel Lightning Cake from The Joy of Cooking (75th Anniversary Edition), by Irma Rombauer, Marion Rombauer Becker, and Ethan Becker.
For truffle filling:
1 ½ cup semisweet chocolate chips
¼ cup flavored creamer (I used eggnog flavor, but any would be great) or half-and-half
10 large marshmallows
Begin melting chocolate chips in 30 second increments in microwave, stirring thoroughly after each interval. As chips begin to melt, stir in creamer and marshmallows and continue to heat. Stir carefully until blended. Set in refrigerator to cool.
Whisk together in a large bowl (I use my stand mixer)
1 ½ cups flour (we often use half whole wheat):
½ cup sugar
½ cup dark brown sugar
1 ½ tsp baking powder
½ tsp salt
Add in and continue to blend:
2 large eggs
1/2 cup milk
1 Tbsp espresso powder
1 Tbsp coffee liqueur (optional)
Beat in and continue to blend until light and airy (about 3 minutes, stopping to scrape down bowl halfway):
½ cup salted butter, softened
Fill cupcake cups ½- ¾ full (I use a large ice cream scoop). Carefully place a small scoop, approximately ½ tsp, of the ganache onto each cupcake, trying not to drop it to the bottom.
Bake at 375 degrees for approximately 16 minutes, watching carefully.
Allow to cool and frost with:
Espresso Mocha Buttercream
2 sticks (1 cup) salted butter
3 ½ cups confectioner’s sugar
2 Tbsp dark cocoa
1 tsp coffee liqueur (optional)
Beat until light and fluffy.
Mandarin Orange Cake
October 1, 2009 : Filed under Cakes, Recipe Box, Sweets
Mandarin Orange Cake
Vicki Webb, January 2008 MMCW
Cake: 1 package of yellow cake mix without pudding, 3/4 cup oil, 4 eggs, 1 can mandarin oranges with juice.
Frosting: 1 large box instant vanilla pudding, 1 (20 oz) can undrained crushed pineapple, 1 (16 oz) Cool Whip topping.
Combine all four ingredients for cake and beat with mixer for 4 minutes. The oranges should be in pieces in the mix. Pour mixture into a greased 9 x 13 pan. Bake 30 minutes or until a toothpick inserted in cake comes out clean. Cool completely.
Mix pudding and Cool Whip with a spoon. Fold in pineapple. Spread frosting on cool cake.
Keep refrigerated until time to serve. This cake is very moist and better if prepared a day ahead.
Perfect Rich Chocolate Birthday Cake
October 1, 2009 : Filed under Cakes, Recipe Box, Sweets
Loi Palmer, March 2007 MMCW
1 package Devil’s Food cake mix, 1 package (3.9 ounce) chocolate instant pudding mix, 1 stick melted butter, 1 cup sour cream, 4 large eggs, 1/2 cup warm water, 1 1/2 cups semisweet chocolate chips.
Preheat oven to 350 degrees. Mist pan with vegetable spray adn then lightly dust with flour, shake out the excess. Set the pan aside.
Place cake mix, pudding mix, eggs, sour cream, warm water, and melted butter in a large mixing bowl. Blend with an electric mixer on low speed for 1 minute. Stop and scrape down the sides of the bowl with a rubber spatula. Increase the mixer speed to medium and beat for 3 minutes. The batter should look thick and well combined. Fold in the chocolate chips.
Pour batter into prepared pan and place in center of the oven. Bake until center springs back when touched.
For a bundt cake, bake about 45 to 50 minutes. For three round layer cakes, bake 30 to 35 minutes. For a 13 x 9 inch cake, bake 40 to 45 minutes.
Let the cake sit in the pan and cool for 5 minutes. Run a knife around the edges of the pan before inverting on a cake plate or wire rack to finish cooling.
Pineapple Upside-Down Cake
October 1, 2009 : Filed under Cakes, Recipe Box, Sweets
Loi Palmer, April 2006 MMCW
This recipe makes two 9 inch round cakes, so surprise a neighbor with a gift from your kitchen.
1 yellow cake mix, 1 cup sour cream, 3 large eggs, 1 cup milk, 1 tablespoon vanilla, 1 stick and 1/2 cup of softened butter, 1 cup firmly packed brown sugar, 2 ( 8 oz) cans of drained crushed pineapple, 1 cup chopped pecans.
Melt 1/2 cup of butter and pour evenly into two ( 9-inch) round cake pans. Sprinkle brown sugar evenly over butter, along with the pecans and crushed pineapple. Set pans aside.
With an electric mixer, blend on medium speed the cake mix, sour cream, eggs, milk, 1 stick of softened butter, and vanilla extract. Spoon batter evenly over pineapple / sugar mixture in prepared pans.
Bake at 350 degrees for 35 minutes or until a toothpick inserted in the cake comes out clean. Cool on wire rack for 10 minutes. Invert while still warm onto cake plate. Top with Whipped Topping (see below for recipe).
Vanilla Wafer Cake
October 1, 2009 : Filed under Cakes, Recipe Box, Sweets
Loi Palmer
1/2 lb butter (2 sticks), 2 cups sugar, 6 eggs, 1 (12 oz) box vanilla wafers crushed, 2 (7 oz) cans coconut, 1 and 1/2 cups pecans broken into pieces, 2 tablespoons milk.
Place vanilla wafers in food processor and crush into crumbs. Set aside. Cream butter and sugar. Add eggs, one at a time, beating 1 minute after each egg. Add crushed vanilla wafer crumbs and 2 tablespoons milk. Add coconut and pecan pieces. Bake in greased and floured tube pan at 325 degrees for 1 1/2 hours.
Let cool completely in pan.
Whipped Topping for Cakes
October 1, 2009 : Filed under Frosting, Recipe Box, Sweets
Loi Palmer, April 2006 MMCW
2 cups whipping cream, 2 tablespoons light brown sugar, 2 tablespoons powdered sugar, 1 teaspoon vanilla.
Pour whipping cream into chilled glass or metal bowl. Add brown sugar and let it dissolve. Mix on high speed until foamy. Add powdered sugar and vanilla. Continue mixing until peaks form. This happens very quickly, be careful not to over beat it. Serve on top of cake.


